Recording a Cheque with the Disbursements Journal
- Click Disbursements Journal in the Command Center.
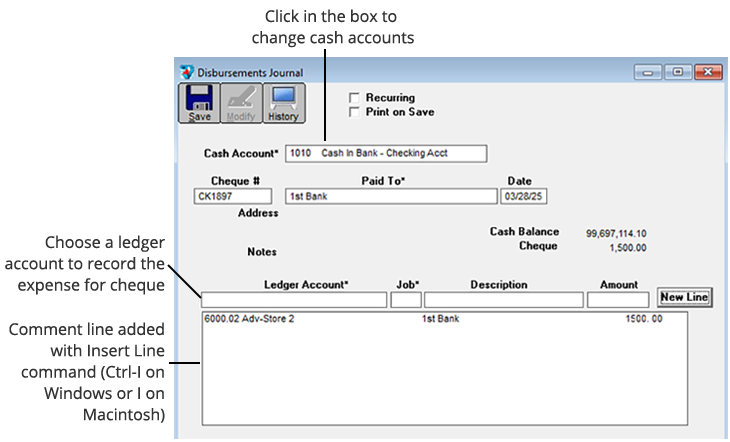
- If necessary, change the cash account for the cheque by clicking in the Cash Acct edit box and selecting another cash account from the pop-up list.
- If necessary, enter or change the Cheque # and press TAB.
The cursor moves to the Paid To field.
- On Windows, select a vendor from the pop-up list, then press TAB, or type a name, then click 1 Time.
If you select a vendor who owes any outstanding payables, an alert appears to remind you to pay outstanding payables in Vendor Payments.
If the 1 Time vendor is used, MultiLedger Canada won’t save the vendor name or track payments made to that vendor. To keep track of payments by vendor name, you must add the vendor in Vendor Setup.
OR
On Macintosh, select a vendor from the pop-up list, then press TAB, or click Cance,l then enter a name manually.
If you select a vendor who owes any outstanding payables, an alert appears to remind you to pay outstanding payables in Vendor Payments.
If the vendor name is typed in manually, MultiLedger Canada won’t save the vendor name or track payments made to that vendor. To keep track of payments by vendor name, you must add the vendor in Vendor Setup.
- Verify that the date for the cheque is correct.
- Select a ledger account for the cheque, enter an amount for the detail line, then press TAB to add the detail line to the cheque.
The Ledger Account is usually an expense account in the 6000–8999 range. Entering a Job and Description are optional. As you add detail lines to the cheque, the Cheque Total field is updated.
After the first detail line is added, the Save button is enabled.
- On Windows, if necessary, click New Line or press ENTER to begin entering another item.
On Macintosh, if necessary, press TAB or RETURN again to begin entering another item.
For field explanations, see “Disbursements Journal Field Descriptions” on page 188.
Note: You can add comment lines to the transaction at any time by choosing Insert Line from the Edit menu (Ctrl-I on Windows or ⌘-I on Macintosh). For more details, see “Adding Comment Lines to Transactions” on page 119.
- When you are finished entering all the information for the cheque, click Save.
When the cheque is saved, it is automatically posted to the general ledger, and the cheque number is increased by one.
Printing Disbursements Journal Cheques
MultiLedger Canada offers you two ways to print a Disbursements Journal cheque:
- Check “Print on Save” in the Disbursements Journal window. Whenever you save a cheque in the Disbursements Journal, a standard Print dialog box will appear. Select your print options and click OK or Print.
OR
- Use Print on the Command Center. After closing the Disbursements Journal window, do the following:
-
- Click Print in the Command Center.
- Select the correct period.
- Click the cheques radio button.
- If necessary, check Print Metafile (Windows) or Print PDF/PICT File (Macintosh).
For more information on using Metafiles or PICT Files, see “Using the Print Screen” on page 90.
-
- Select the cheques that you want to print.
If no cheques are selected, then all cheques will print.
-
- Click Print.
- Select your print options and click OK or Print.
For more details about the Print command, see “Using the Print Screen” on page 90.
If you need to adjust where the fields print on a cheque, see “Customizing Print Field Positions for Your Printer” on page 95.
Modifying or Deleting Disbursement Journal Documents
When the cursor is in the Cheque # field, the Modify button is enabled. Click Modify to see a list of Disbursements Journal cheques that you can modify or delete. If the cheque you’re looking for doesn’t appear, you may have to select another month from the pull-down menu.
Please note that the cheques that appear here also include cheques recorded in Vendor Payments.