Creating a New Company File on Windows
- Open MultiLedger Canada by clicking the shortcut on your desktop.
- Choose New Company from the File menu.
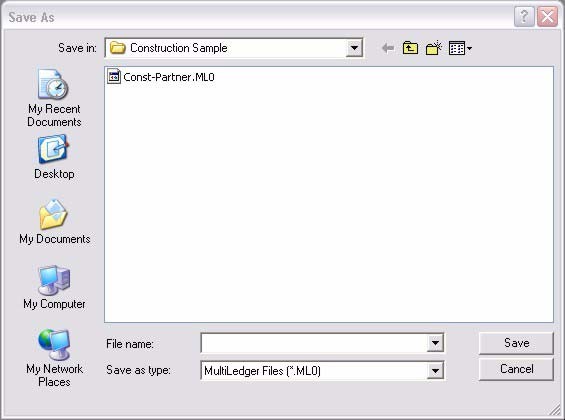
- Enter a name for your company files.
The default location for your company files is the MultiLedger Canada directory.
Important: Use a short name, such as “ABC” instead of “American Business Company,” to identify your company files. The name is used only to identify your company’s data files – it does not appear on reports. A short name will be easier to find in a window on your desktop or in a dialog box than a long one.
Note: You can easily rename your company files at any time. For more information, see “Renaming Company Files” on page 235. You should NEVER rename your files using any other method, as you may make your files inaccessible.
- Click Save.
A folder called “COAs” is installed in the “MultiLedger Canada” folder. This folder contains several charts of accounts that you can modify for your own business. Appendix B, “Sample Charts of Accounts,” in this manual shows each of the sample charts of accounts.
- Select Yes or No
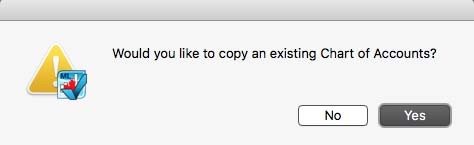
If you want to create a new chart of accounts, click No. After you click no, MultiLedger Canada’s Command Center appears on your screen with only the Company Information button enabled
All other Command Center buttons are disabled until you set up basic company information. The next section shows you how to do this.
If you want to copy an existing chart of accounts, click Yes.
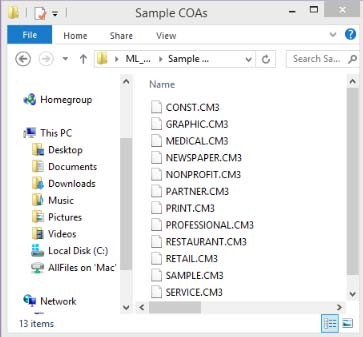
Open the “COAs” folder, then select the chart of accounts you want to copy. You can also open the “SampleCo” folder, select the folder for the type of chart of accounts you want to copy, and then select the chart of accounts.
-
- Click Open.
MultiLedger Canada’s Command Center appears on your screen with only the Company Information button enabled.
All other Command Center buttons are disabled until you set up basic company information. For more information, see “Setting Up Basic Company Information” on page 20.
Creating a New Company File on Macintosh
- Double-click the MultiLedger Canada™ alias on the dock or desktop.
- Choose New Company from the File menu.
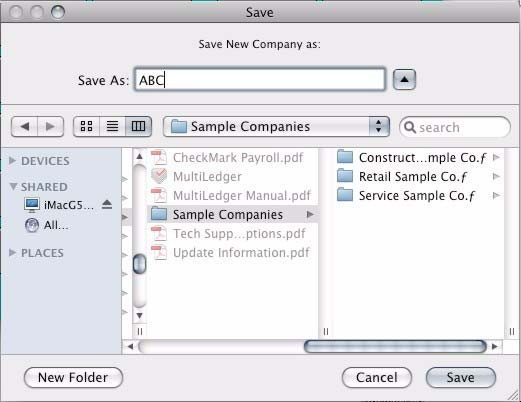
- Enter a name to identify your company, choose the location where you want to save your company files, and click save. It’s best to save this either on the Hard Drive or in the Documents folder. A new folder containing your company files will be created with the name you entered.
Important: Use a short name for your company files, such as “ABC” instead of “American Business Company”. The name is used only to identify the folder that is created and the company’s data files saved in that folder. For example, entering the name “ABCf” would contain data files whose names begin with “ABC”. The “f” is automatically added to the folder name to identify it as a folder.
The name “ABC” does not appear on reports or cheques. You will set up the company name for reports and cheques in the company information window.
Note: You can easily rename your company files at any time. For more information, see “Renaming Company Files” on page 235. You should never rename your own business. Appendix B, “Sample Charts of Accounts,” in this manual shows each of the sample charts of accounts.
- After the new company name has been entered, click Save.
A folder called “Sample COAs” is installed in the “MultiLedger Canada” folder. This folder contains several charts of accounts that you can modify for your own business. Appendix B, “Sample Charts of Accounts,” in this manual shows each of the sample charts of accounts.
- Select Yes or No.
If you want to create a new chart of accounts, click No and skip to Step 1 on the next page.
If you want to copy an existing chart of accounts, click Yes.
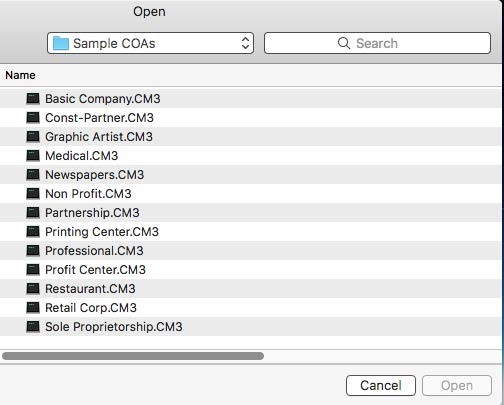
Open the “Sample COAs” Folder, then select the chart of accounts you want to copy. Or you can also open the “ML Sample Companies” folder, select the folder for the type of chart of accounts you want to copy, then select the chart of accounts:
- Click Open.
MultiLedger Canada’s Command Center appears on your screen with only the Company Information button enabled.
All other Command Center buttons are disabled until you set up basic company information. The next section shows you how to do this.